
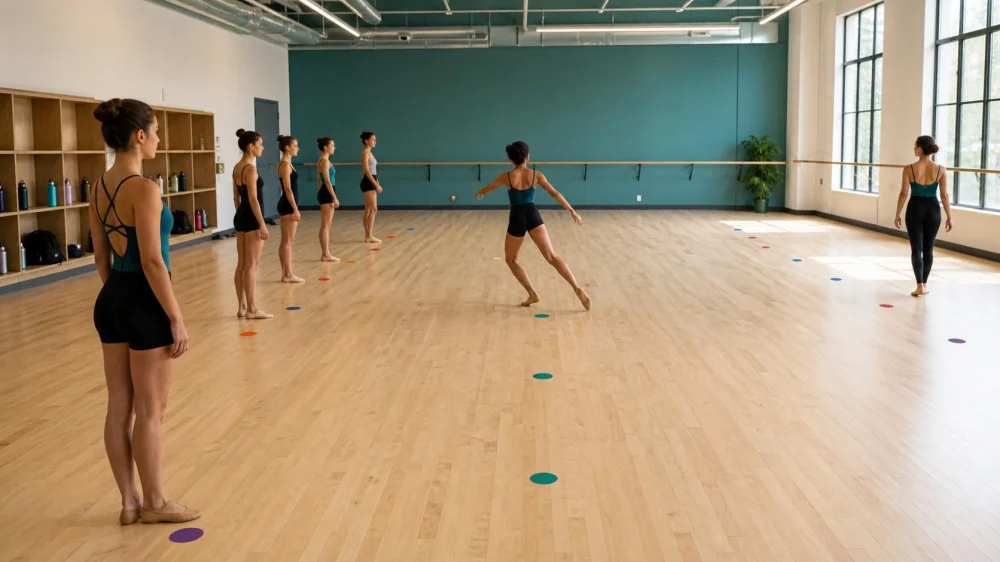
Across-the-Floor Dance Drills: Spacing and Safe Reentry
Table of contents
Quick answer
Before an across-the-floor drill, identify the start, travel lane, finish, and return route. Leave only on the teacher's cue or when the dancer ahead reaches a named landmark. Travel predictably, adjust the step rather than overtaking, clear the landing zone immediately, and return around the room's edge. Stop the drill if spacing collapses, someone falls, or the floor becomes wet or obstructed.
Map the travel lane
Across-the-floor work may be diagonal, straight downstage, or organized in several parallel lanes. The teacher should demonstrate the exact start and end points, direction of turns, intended facing, and where dancers wait. Mirrors can reverse a verbal direction, so point to the physical corner instead of relying only on “left” or “right.”
Keep bags, bottles, warm-ups, props, and unused portable barres outside the route. Mark a safe waiting line and finish zone with studio-approved removable tape or floor dots when helpful. Never use a marker that damages the surface or creates a raised edge.
Set an order and release cue
Choose a repeatable order: single dancers, pairs, trios, or numbered groups. State whether the next group leaves on a musical count, a teacher's signal, or when the prior group passes a landmark. A clear release rule prevents a fast dancer from starting too soon and a hesitant dancer from being pressured from behind.
Dancers waiting near the start should face the travel lane, remain quiet enough to hear corrections, and avoid practicing large steps in the queue. If you miss your cue, step back and join the next appropriate group rather than launching late into occupied space.
Maintain useful spacing
Spacing must account for the widest shape, longest stride, speed, turns, and unpredictable balance recovery—not just standing shoulder width. Traveling jumps and turns need more room than walks or small isolations. Props, skirts, canes, and partner holds expand the effective footprint.
Use peripheral awareness without twisting away from the choreography. If you gain on the dancer ahead, reduce travel, mark the step, or stop safely; do not pass. If someone behind approaches, maintain a predictable path instead of darting sideways. The teacher can reset the interval when repeated bunching occurs.
Clear the finish zone
The last movement often contains the largest jump, turn, or balance, so the finish area must stay open. Complete the phrase, control momentum, and move immediately to the assigned exit side. Do not celebrate, ask a question, pick up a bottle, or wait for friends inside the landing zone.
If momentum carries you farther than expected, continue into open space and regain control before changing direction. A dancer who falls should signal and stay still if injured; the teacher should stop incoming groups rather than expecting others to weave around them.
Reenter without crossing traffic
Return along the perimeter or a designated corridor. Walk, do not practice the combination backward through the active lane. Keep clear of the starting line so the next group can see and hear. If the studio has several drills at once, each needs a separate return path.
Join the end of the queue unless the teacher assigns another order. To ask a question, wait near the teacher without blocking the release point. Retrieve belongings only during a pause and only from a route that does not cross moving dancers.
Adapt for class size and movement
Large classes may need smaller groups, longer release intervals, or two carefully separated lanes. Small rooms may suit shorter phrases, stationary versions, or alternating halves of the class. Advanced speed does not justify reduced space; more momentum can require more margin.
Wheelchairs, mobility devices, canes, prostheses, sensory needs, and different movement ranges should be included in the route plan rather than treated as last-minute exceptions. Ask dancers what spacing and cueing supports them. Adjust the choreography, group size, and surface—not the person's right to participate.
Pause for floor hazards
Stop when water, sweat, rosin buildup, a loose floor edge, splinter, cable, dropped accessory, broken shoe, or other hazard enters the route. Alert the teacher clearly. No dancer should quietly step over a problem and leave it for the next group.
Use the studio's cleaning and incident process. Do not apply household cleaner, powder, water, or tape without permission; residues can change traction. Resume only after the responsible person confirms the route is ready and everyone understands the restart group.
Drill checklist
- Identify start, lane, finish, waiting area, and return path.
- Remove bottles, bags, props, and cables.
- Confirm groups and the release cue.
- Leave enough space for the largest movement.
- Never overtake inside the active lane.
- Clear the finish immediately.
- Return around the perimeter.
- Stop the drill for falls, spills, or hazards.
- Reset spacing when the phrase or class size changes.
Limitations and safety note
This is general class-organization guidance, not medical advice or a substitute for a qualified teacher's assessment of the studio, dancers, and choreography. Floor type, room geometry, age, mobility, footwear, and technique affect safe spacing. Follow the studio emergency plan and seek appropriate care after an injury.
Frequently asked questions
How many counts should separate groups?
There is no universal number. Use a physical landmark or enough musical counts for the widest and fastest part of the phrase, then increase the interval if dancers gain on one another.
Can two lanes run at once?
Yes, when the room is wide enough, paths do not converge, and finish and return routes stay separate. Start with one lane if any boundary is unclear.
What if I forget the phrase halfway across?
Move predictably to a safe edge or mark in place without cutting across another dancer. Rejoin a later group after reviewing the sequence.
Should faster dancers go first?
Not automatically. The teacher may group compatible travel speed or experience, but clear release intervals matter more than ranking dancers.
What if the floor is sweaty?
Stop and alert the teacher. Use the studio's approved cleaning method and resume only after the area is dry and cleared.
Sources and further reading
- International Association for Dance Medicine & Science: Studio Spacing Practices — includes examples of marked dance areas, one-at-a-time travel, and designated waiting points.
- IADMS Bulletin for Dancers and Teachers — provides research-informed resources on dancer health, training, and studio practice.
Next steps
At the next class, identify the finish zone and return route before the first group leaves. Pick one release landmark, keep the perimeter clear, and watch whether dancers gain on one another. If the phrase changes from walks to turns or jumps, stop and reset the interval rather than carrying the old spacing into a larger movement.


 Sicilia Elower5.0 (7 reviews)
 Trinity Academy of Irish Dance4.0 (11 reviews)
 Khushboo Dance Academy0.0 (0 reviews)
 The Dance Place LLC5.0 (2 reviews)
 Sheryl's School Of Dance5.0 (22 reviews)
 Arts In Motion Dance Studio4.0 (13 reviews)
 Contemporary Dance for Adults – Benefits, Getting Started, and Success Stories
 Can Dance Schools Reopen in NJ? What Parents and Students Should Know
 Top 10 Swing Dance Moves Fitness Routine – Improve Your Fitness with Dance
 Hip Hop That Boosts Confidence – What You Need to Know
 Pole Dance Step by Step Guide: Master the Basics and Advanced Moves
 Shuffle Dance Trending on TikTok: Step by Step Guide for Beginners